HI All,
I have created a detailed document on DMT tool, please find the document in below link
Thanks,
Shwetha
HI All,
I have created a detailed document on DMT tool, please find the document in below link
Thanks,
Shwetha
using System.IO;
using OfficeOpenXml;
using OfficeOpenXml.ExcelPackage;
using OfficeOpenXml.ExcelRange;
using OfficeOpenXml.Style;
using OfficeOpenXml.Table;
class Export_And_Import extends RunBase
{
//Export Template
public void ExportData()
{
MemoryStream memoryStream = new MemoryStream();
using (var package = new ExcelPackage(memoryStream))
{
var currentRow = 1;
var worksheets = package.get_Workbook().get_Worksheets();
var Worksheet = worksheets.Add("Other Pay Elements");
var cells = Worksheet.get_Cells();
OfficeOpenXml.ExcelRange cell;
System.String value;
cell = cells.get_Item(currentRow, 1);
cell.set_Value("Employee Id");
cell = cells.get_Item(currentRow, 2);
cell.set_Value("Month");
cell = cells.get_Item(currentRow, 3);
cell.set_Value("Year");
cell = cells.get_Item(currentRow, 4);
cell.set_Value("Date");
cell = cells.get_Item(currentRow, 5);
cell.set_Value("Addition / Deduction");
cell = cells.get_Item(currentRow, 6);
cell.set_Value("Pay Element Code");
cell = cells.get_Item(currentRow, 7);
cell.set_Value("Payroll Amount");
package.Save();
file::SendFileToUser(memoryStream, "Other Pay Elements Import.xlsx");
}
}
//Import Data
public void ImportData()
{
System.IO.Stream stream;
ExcelSpreadsheetName sheeet;
FileUploadBuild fileUpload;
DialogGroup dlgUploadGroup;
FileUploadBuild fileUploadBuild;
FormBuildControl formBuildControl;
Dialog dialog = new Dialog("Import Pay Elements");
str ctrl = "Import";
PayElements payElements;
AddDeduct addDeduct;
dlgUploadGroup = dialog.addGroup("@SYS54759");
formBuildControl = dialog.formBuildDesign().control(dlgUploadGroup.name());
fileUploadBuild = formBuildControl.addControlEx(classstr(FileUpload), ctrl);
fileUploadBuild.fileTypesAccepted('.xlsx');
if (dialog.run() && dialog.closedOk())
{
FileUpload fileUploadControl = dialog.formRun().control(dialog.formRun().controlId(ctrl));
FileUploadTemporaryStorageResult fileUploadResult = fileUploadControl.getFileUploadResult();
if (fileUploadResult != null && fileUploadResult.getUploadStatus())
{
stream = fileUploadResult.openResult();
using (ExcelPackage Package = new ExcelPackage(stream))
{
int rowCount, i;
Package.Load(stream);
ExcelWorksheet worksheet = package.get_Workbook().get_Worksheets().get_Item(1);
OfficeOpenXml.ExcelRange range = worksheet.Cells;
rowCount = worksheet.Dimension.End.Row - worksheet.Dimension.Start.Row + 1;
for (i = 2; i<= rowCount; i++)
{
select payElements where payElements.EmplId == range.get_Item(i, 1).value
&& payElements .PayElementCode == range.get_Item(i, 6).value
&& payElements .EffectiveDate == DateTimeUtil::date(range.get_Item(i, 4).value);
if(!payElements )
{
payElements .EmplId = range.get_Item(i, 1).value;
payElements .PayslipMonth = str2Int(range.get_Item(i, 2).value);
payElements .PayslipYear = str2Int(range.get_Item(i, 3).value);
payElements .EffectiveDate = DateTimeUtil::date(range.get_Item(i, 4).value);
payElements .AddDeduct = str2Enum(addDeduct,range.get_Item(i, 5).value);
payElements .PayElementCode = range.get_Item(i, 6).value;
payElements .Amount = any2Real(range.get_Item(i, 7).value);
payElements .insert();
}
else
{
continue;
}
}
info("Pay Elements Imported");
}
}
else
{
error("File was not Loaded Properly");
}
}
}
public static void main(Args args)
{
PayElementsImport objimport = new PayElementsImport ();
DialogButton dialogButton;
dialogButton = Box::yesNo("Create Empty Excel",DialogButton::Yes,"Empty Excel","Yes OR No");
if(dialogButton == DialogButton::Yes)
{
objimport.ExportData();
}
objimport.ImportData();
}
}
Example::
[FormDataSourceEventHandler(formDataSourceStr(CustTable, CustTable), FormDataSourceEventType::Activated)]
public static void CustTable_OnActivated(FormDataSource sender, FormDataSourceEventArgs e)
{
CustTable custTable = sender.cursor(); //selected record
FormDataSource custTable_ds = sender.formRun().dataSource("CustTable"); //DataSource form CustTable
FormRun element = sender.formRun(); //form element
FormControl myNewButton = element.design(0).controlName("MyNewButton"); //New button on the form
FormStringControl strResult;
FormRealControl realResult;
FormIntControl intResult;
FormDateControl dateResult;
FormComboBoxControl comboResult;
//To Get DataSource Current Record of a Field
custTable.AccountNum = XXX.valueStr();
//Str
strResult = element.design().control(element.controlId("strResult"));
//Set
strResult.text("this is what it should say");
//Get
strResult.valueStr();
//Real
realResult = element.design().control(element.controlId("realResult"));
//Set
realResult.realValue(50.05);
//Get
realResult.value();
//Integer
intResult = element.design().control(element.controlId("intResult"));
//Set
intResult.value(50);
//Get
intResult.value();
//Date
dateResult = element.design().control(element.controlId("dateResult"));
//Set
dateResult.dateValue(today());
//Get
dateResult.dateValue();
//Date
comboResult = element.design().control(element.controlId("comboResult"));
//Set
comboResult.selection(1);
//Get
comboResult.valueStr(); //Convert to Enum to Str
myNewButton.enabled(false); //Here you do your code to enabled or disabled the button
}
Go to
preRunModifyContract() override Method in Controller class and add the below code
CODE:
this.parmReportContract().parmRdlContract().parmLanguageId(VendTable::find(vendPurchOrderJour.OrderAccount).languageId());
That’s all !!!!
Business process automation (BPA) is the use of information technology to help companies automate their business processes. It’s a broad term that can encompass anything from simple, repetitive tasks like data entry to more complex workflows like customer order processing.
Power Automate and Azure Logic Apps are workflow services that can automate your processes, business, or system and integrate with Microsoft and 3rd party services with over 300 connectors. These powerful services are designed to get you going quickly, building the workflow between business services providing that familiarity without having the steep learning curve.
Power Automate provides a user-friendly and focused experience within Office 365 that can easily get end-users going once assigned an appropriate license.

Azure Logic Apps provide a user-friendly designer surface similar to Power Automate with the option to build complex integration solutions, utilize advanced development tools, DevOps and monitoring, if required.

The main difference between Power Automate and Logic Apps is that Power Automate is a Robotic Process Automation tool while Logic Apps is an Integration Platform as a Service. Both tools can be used to automate business processes, but they differ in terms of the scale and scope of automation possible.
Power Automate is better suited for automating simple, repetitive tasks that can be performed by a robot with no need for human intervention. These tasks are typically well-defined, rules-based processes such as data entry or form submission. Power Automate can also be used to automate more complex processes by chaining together multiple actions and triggers, but this requires more setup and maintenance than using Logic Apps.
Logic Apps is designed for automating complex processes that involve multiple systems and require human interaction at various points. For example, a process might start when an order is received in an e-commerce system, then trigger an approval request in a CRM system, followed by a series of actions in an accounting system to generate invoices and payments. Each step in the process can be configured to run automatically or wait for manual intervention before proceeding to the next step.
Power automate:
1. It is available as part of O365 applications
2. Power automate is a browser-based application which means you can modify it only using the browser
3. Microsoft Flow can be accessed and modified in a Mobile app
4. For Power Automate, either you pay on a per-flow or per-user basis.
5. If you have a relatively simple application to create then you should go for Power Automate.
6. If your application is using Office 365 / Dynamics application then you can probably pick Power Automate.
7. If Citizen Developers are creating the application, you can go with Power Automate.
8. Visio Plan 2 offers the feature to create a Business Process Model and Notation (BPMN) diagrams and export for Power Automate.
Logic apps:
1. Logic apps is a part of the Azure platform
2. You can work with Logic apps in a browser as well as in a visual studio designer.
3. Logic Apps cannot be operated from a mobile app
4. For Logic Apps you pay as you use. That means whenever Logic apps run, connectors, triggers, and actions are metered and based on that the user is charged.
5. If you want to create an application that has complicated requirements then you should go for Logic Apps
6. If your application is mostly using Azure services, then you can go ahead with Azure Logic Apps
7. If Pro developers are working, then you can go ahead with Logic Apps without any hesitation.
8. Visual Studio supports working with Azure solutions, including Logic Apps, that allows you to connect to a subscription and provides a logic app editor experience.
9. Visual Studio Code is a free and open-source code editor with wide-range support for programming languages with IntelliSense, extensions to select the tools you work with extending the functionality of the tool as best fits the project you are working on.
You can install the extension (Azure Logic Apps for Visual Studio Code) from the Marketplace - Visual Studio Marketplace

What is Azure DevOps?
Azure DevOps is a Software as a service (SaaS) platform from Microsoft that provides an end-to-end DevOps toolchain for developing and deploying software. It also integrates with most leading tools on the market and is a great option for orchestrating a DevOps toolchain.
Azure DevOps comprises a range of services covering the full development life cycle.
Azure DevOps can also be used to orchestrate third-party
Azure Repos is a set of version control tools that you can use to manage your code. Whether your software project is large or small, using version control as soon as possible is a good idea.
Version control systems are software that help you track changes you make in your code over time.
Azure Repos provides two types of version control:
· Git: distributed version control
· Team Foundation Version Control (TFVC): centralized version control
Git is the most commonly used version control system today and is quickly becoming the standard for version control. Git is a distributed version control system, meaning that your local copy of code is a complete version control repository. These fully functional local repositories make it is easy to work offline or remotely. You commit your work locally, and then sync your copy of the repository with the copy on the server.
Git in Azure Repos is standard Git. You can use the clients and tools of your choice, such as Git for Windows, Mac, partners' Git services, and tools such as Visual Studio and Visual Studio Code.
TFVC is a centralized version control system. Typically, team members have only one version of each file on their dev machines. Historical data is maintained only on the server. Branches are path-based and created on the server.
In summary, Git is a distributed version control system that allows users to work locally and provides a flexible and powerful way to manage code changes, while TFVC is a centralized version control system that requires a connection to a central server and operates on a check-in/check-out model.
Without version control, you're tempted to keep multiple copies of code on your computer. This is dangerous, because it's easy to change or delete a file in the wrong copy of code, potentially losing work. Version control systems solve this problem by managing all versions of your code but presenting you with a single version at a time.
Version control systems provide the following benefits:
There are plenty of things that can take up your time as a developer: reproducing bugs, learning new tools, and adding new features or content. As the demands of your users scale up, version control helps your team work together and ship on time.
TFVC is a centralized version control system. Typically, team members have only one version of each file on their development machines. Historical data is maintained only on the server. Branches are path-based and created on the server.
TFVC lets you apply granular permissions and restrict access down to a file level. Because your team checks all its work into Azure DevOps Server, you can easily audit changes and identify which user checked in a changeset. By using compare and annotate, you can identify the exact changes that they made.
The Customization Analysis Report is a tool that analyzes your customization and extension models, and runs a predefined set of best practice rules. The report is one of the requirements of the solution certification process. The report is in the form of a Microsoft Excel workbook. By using this command you can get Complete details of your BP Errors, warnings, and Errors.
Steps to make Customized analysis report.


Microsoft’s Azure Data Platform is a group of cloud-based services for organizing and analyzing data. Among these services are:
Azure Data Lake Storage
Microsoft Azure offers a fully managed data lake service called Azure Data Lake Storage. Data can be processed and retrieved using a range of tools and technologies, including HDInsight, Azure Data Factory, and Azure Databricks. Data can be saved in a variety of formats, including both structured and unstructured data. For more sophisticated analytics and data visualization, Data Lake Storage now connects with Azure services like Azure Stream Analytics, Azure Machine Learning, and Azure Power BI.
Azure Data Factory
Microsoft Azure offers Azure Data Factory, a service for integrating data in the cloud. Users can design, plan, and control data pipelines that transfer and transform data between different sources and destinations. Numerous on-premises and cloud-based data stores, including SQL Server, Azure SQL Database, Azure Data Lake Storage, and Azure Blob Storage, are supported by Data Factory. The service also supports custom code using Azure Functions and Azure Data Lake Analytics, as well as built-in data flow transformations like data mapping, filtering, and aggregation. The pipelines can also be coupled with Azure services like Azure Databricks, Azure Stream Analytics, and Azure Machine Learning for building utilizing a visual interface.
Azure Databricks
Azure Databricks is a big data analytics service built for data science and data engineering that is quick, simple, and collaborative. Data scientists, data engineers, and business analysts may collaborate with big data in a collaborative, interactive environment thanks to its open-source Apache Spark foundation.
Azure Cosmos DB
Azure Cosmos DB is a fully managed NoSQL and relational database for modern app development. Azure Cosmos DB offers single-digit millisecond response times, automatic and instant scalability, along with guaranteed speed at any scale. It is a globally distributed, multi-model database service designed for handling large amounts of data. As a fully managed service, Azure Cosmos DB takes database administration off your hands with automatic management, updates, and patching. It also handles capacity management with cost-effective serverless and automatic scaling options that respond to application needs to match capacity with demand.
Azure SQL Database
Azure SQL Database is a relational database service offered by Microsoft Azure. It is fully managed service and offers all of SQL Server’s features and functionalities with the additional advantages of being completely managed and scalable in the cloud.
Azure Synapse Analytics
Data integration, enterprise data warehousing, and big data analytics are all combined into one unrestricted analytics solution called Azure Synapse Analytics. It enables you to analyse data on an integrated workspace. You have the choice to query data at scale utilising serverless or dedicated alternatives, as you see fit. To ingest, investigate, prepare, process, manage, and provide data for urgent BI and machine learning needs, Azure Synapse unifies these realms.
Azure Stream Analytics
Azure Stream Analytics is a completely managed stream processing engine used to analyse and process massive amounts of streaming data at sub-millisecond latencies. Data originating from several input sources, such as applications, devices, sensors, clickstreams, and social media feeds, can be examined for patterns and linkages. These patterns can be used to start workflows and trigger events like alert creation, information feeding into reporting tools, or storing altered data for future use.
Azure Machine Learning
Azure Machine Learning is a cloud-based service provided by Microsoft that allows users to build, deploy, and manage machine learning models. It can be used for a wide range of applications including image and speech recognition, natural language processing, and predictive analytics. It also allows for a smooth integration with other Azure services such as Azure Databricks and Azure Data Factory for data processing and storage.
Azure Power BI
A business intelligence and data visualization tool. It enables you to share insights throughout your organisation and visualise your data, as well as incorporate those insights into your app or website. Together, Azure Analytics and Power BI offer insights at scale, enabling you to establish the data-driven culture necessary to succeed a fast-paced, competitive environment.
Azure Analysis Services
Microsoft’s Azure Analysis Services is a platform-as-a-service (PaaS) that lets customers build and maintain semantic data models in the cloud. It is based on the xVelocity in-memory analytics engine, which is also used by SQL Server Analysis Services and Microsoft Power BI. Users of Azure Analysis Services can build multidimensional or tabular data models that can be used with business intelligence (BI) tools like Excel, Power BI, and others to analyze data.
A pretty common scenario in most implementations is the need to import data. In this example, we will look specifically at general ledger data, as almost every project imports some form of General Ledger history.
There are a few ways to go about this. The Excel add in is a great tool for small volumes of data but won’t handle large volumes well (1000+ lines).
For large imports, the Data Management Framework (DMF) is an excellent choice. This provides a tool that can handle very large files, large volumes of files, and automated processing.
We will be using the Ledger Journal Entity (LedgerJournalEntity), and to keep this scenario real world, we will also add a custom field to the ledger journal lines table to reference a legacy account code.
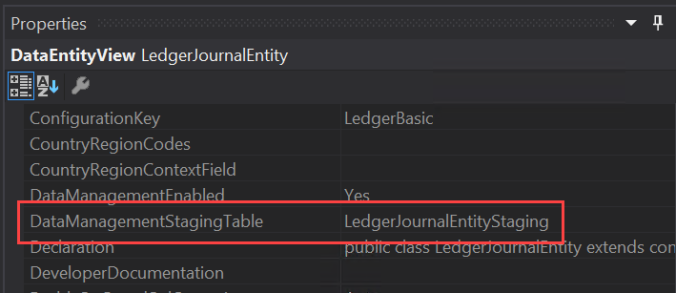
We need to populate a new field on the journal line with a legacy account code. To do this we first need to identify the objects we need to modify. LedgerJournalTrans is the easy one. We know we are using the General journal entity. By looking at the properties of the entity in Visual Studio, we can see the staging table used by the entity is called LedgerJournalEntityStaging. We will also need to add our custom field to this table and extend the entity to expose the new field.
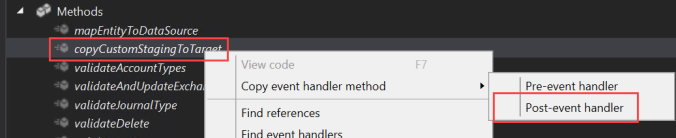
And lastly, we will need to populate our new field when the journal is created. Our new field will be populated in the staging table by the mapping on the DMF project. Our new field on the journal line (LedgerJournalTrans) will need to be populated explicitly by us. To determine how to do this, look at the method copyCustomToStaging on the LedgerJournalEntity object. You can see the data is inserted into the LedgerJournalTrans table via a insert_recordset operation. In fact, all operations are recordset based, to improve performance.

We don’t want to customize any objects, so what do we do? We can create an event handler for the post event of this method, and in our own recordset operation, populate our new field.
Create a new class, paste in the method header, and write your update command. Note the skipDataMethods call – without this the update operation will revert to record by record updates. For a 10,000 line file, that’s about two hours vs two minutes.
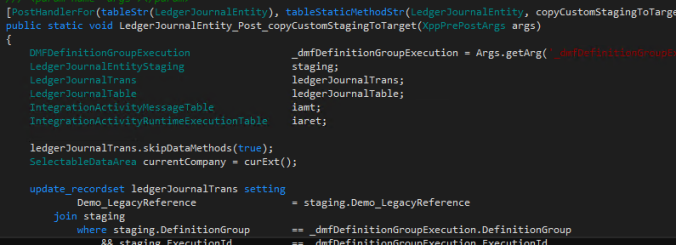
Full method:
[PostHandlerFor(tableStr(LedgerJournalEntity), tableStaticMethodStr(LedgerJournalEntity, copyCustomStagingToTarget))]
public static void LedgerJournalEntity_Post_copyCustomStagingToTarget(XppPrePostArgs args)
{
        DMFDefinitionGroupExecution                 _dmfDefinitionGroupExecution = Args.getArg('_dmfDefinitionGroupExecution');
        LedgerJournalEntityStaging                  staging;
        LedgerJournalTrans                          ledgerJournalTrans;
        LedgerJournalTable                          ledgerJournalTable;

        ledgerJournalTrans.skipDataMethods(true);
        SelectableDataArea currentCompany = curExt();

        update_recordset ledgerJournalTrans setting
                Demo_LegacyReference                = staging.Demo_LegacyReference
            join staging
                where staging.DefinitionGroup       == _dmfDefinitionGroupExecution.DefinitionGroup
                    && staging.ExecutionId          == _dmfDefinitionGroupExecution.ExecutionId
                    && staging.TransferStatus       == DMFTransferStatus::Completed
                    && staging.JournalBatchNumber   == ledgerJournalTrans.JournalNum
                    && staging.LineNumber           == ledgerJournalTrans.LineNum;
} |
We only need a handful of values to create a journal. Obviously debit or credit, currency code, transaction date, account string. We know we also have our new field. We can also have a field for our journal batch number.
So our format (CSV) will look like this – Batch, Date, Account, Legacy account, Currency, Debit, Credit.
We will also need to format the values in our file correctly – specifically dates and numbers.
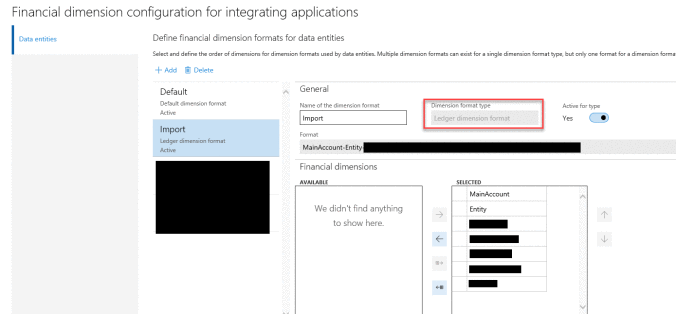
As important as the format of our source file is the format of our account string (GL account + dimensions). This is setup under General ledger \ Chart of accounts \ Dimensions \ Financial dimension configuration for integrating applications.
A few things to remember before you begin – Make sure the dimension format type is “Ledger dimension format.” Include all your dimensions – you can only have one format, but you can leave unused dimensions blank in the account string.
In D365, we need to create a new DMF project to import our data. Do this from the Data Management workspace, click on “Import.”
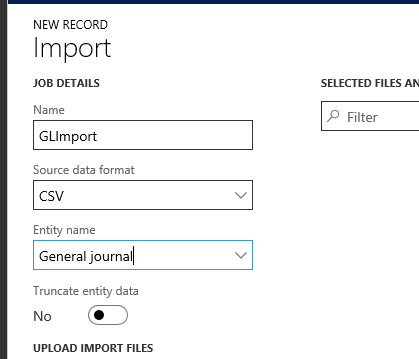
Upload a sample source file which will generate mapping.
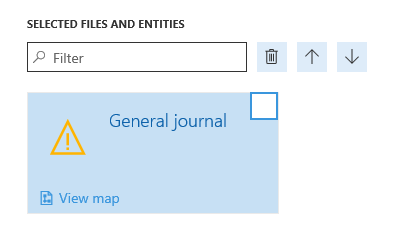
Click on “View map” and switch to the Mapping details tab (I prefer this over the visual mapping tool).
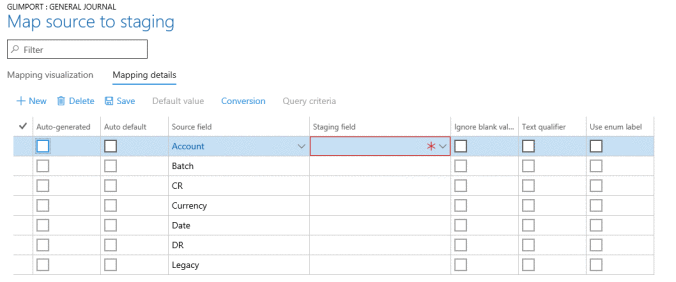
And complete the mapping setup.
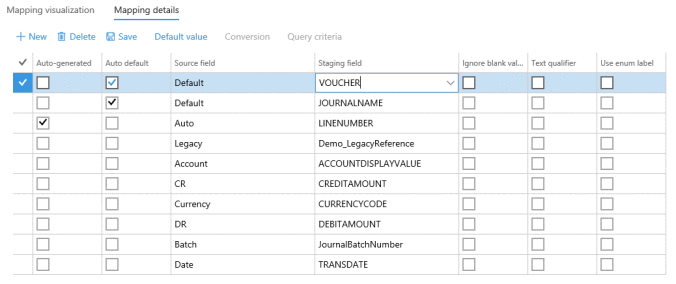
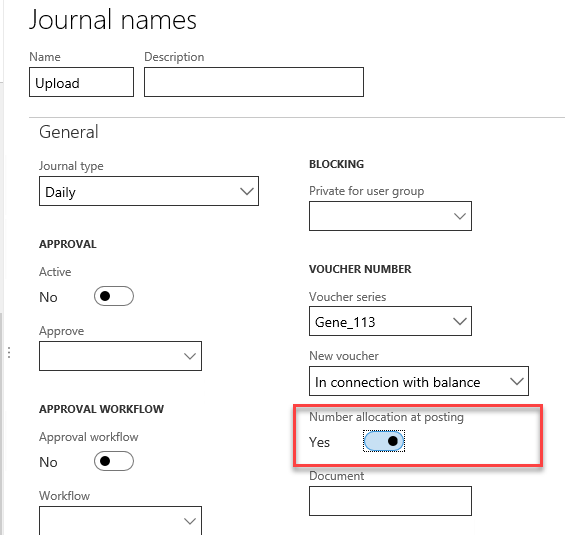
Note the three additional lines for voucher, journal name & line number. Line number is auto generated, journal name is defaulted to a value of our choosing via the default value button (Upload in my case) and voucher is auto defaulted also (I used VN1). Voucher will be replaced with a real voucher number when the journal is posted, based on the “Number allocation at posting” setting on the journal name setup.
Next we create the recurring data job. This will create a endpoint we can enqueue our files to as well as the batch job to process the inbound message.
Note the ID – this will form part of our URL later when we build our logic app.
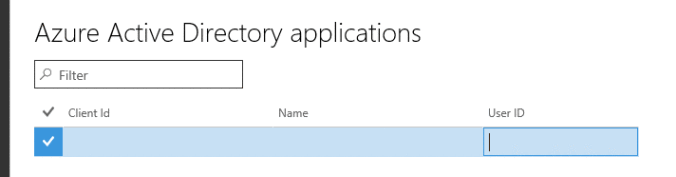
The Application ID needs to come from your Azure AAD Application.
Set both the processing and monitoring recurrence as necessary.
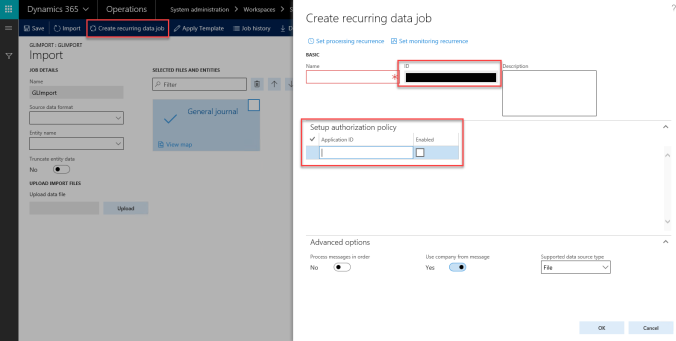
This will associate our integration with a user account in D365.
I’m not going to cover the entire Logic App creation, as Microsoft are soon to publish an ARM Template for this. Below is the basic flow of two Logic Apps. This is pretty simple – you could do a lot more here in terms of error handling if you were so inclined.
Logic App #1 (Get-files)
Below is the HTTP POST action in Logic App #1, which passes the Company, file name & file path to Logic App #2. Note the ability to use expressions in the input of the action. Take a look at the Workflow Definition Language schema for Azure Logic Apps for more detail.
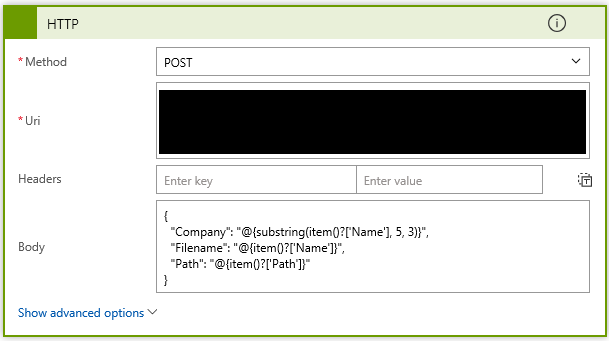
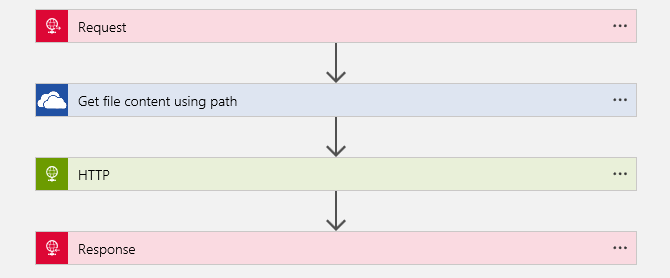
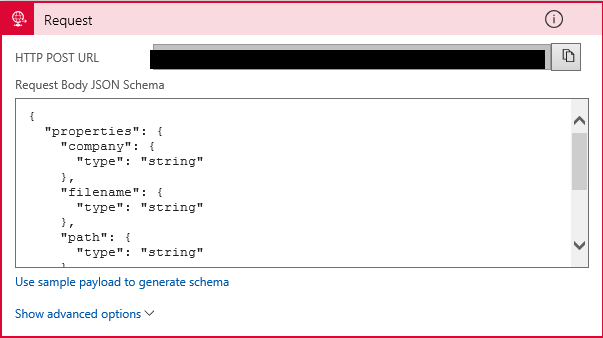
The first action is the HTTP Request. Use the HTTP POST URL to call this Logic App from the first Logic App. The parameters we need to receive are defined in the Request Body JSON Schema.
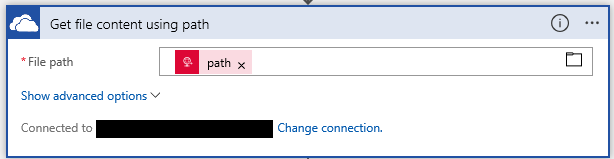
Next, using the Path parameter and the “Get file content using path” OneDrive for Business action, we get the contents of our source file.
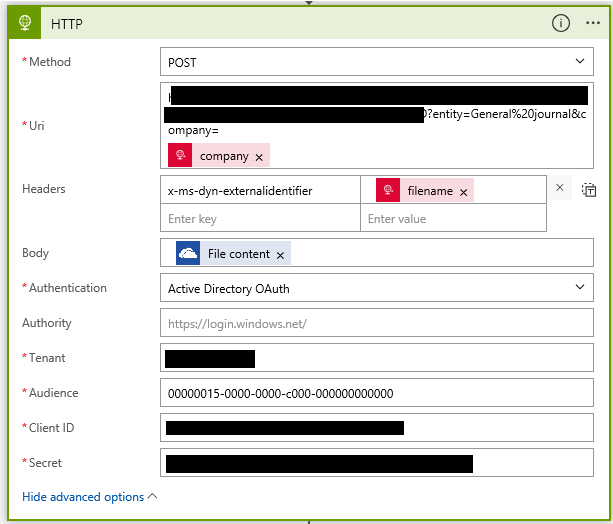
Now we have the file contents, we can send it to D365. I’m using the HTTP POST action.
The URI is made up of a number of different pieces of information
So the full URI would look something like the following:
Note %7b & %7d before and after the recurring integration ID are the URL escape characters for { & }.
Also note I am using the company parameter on the end of the URI to specify the import company, not hard coding it.
To make life a bit easier we can also pass the file name to D365 using the header x-ms-dyn-externalidentifier key with the value to be our file name.
We set the body of our request to be the source file contents.
For authentication we use Active Directory OAuth. Tenant is your o365 tenant domain.
Audience was a little tricky to find, but I believe it is constant for D365 for Operations. Here is where that value came from.
Client ID and Secret come from your AAD application.
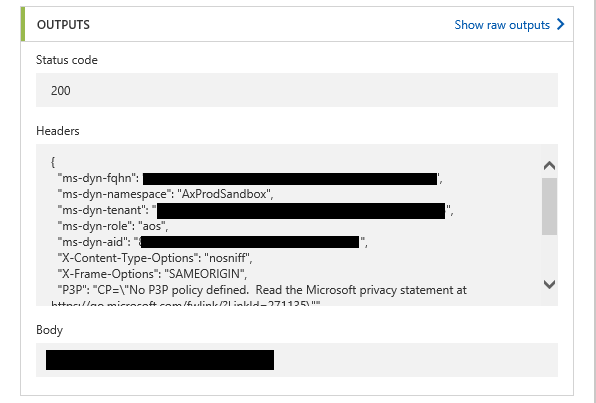
Our response takes the status code received from D365 and the Body (hopefully the message ID otherwise an error message) and returns those to our first Logic App.
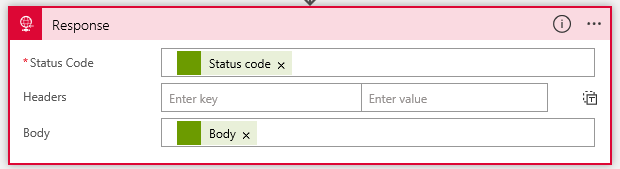
Response from HTTP POST action to D365:
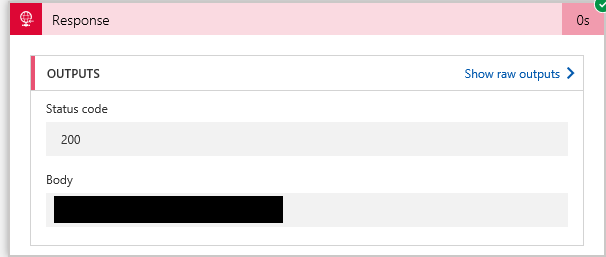
Response sent back to Logic App #1:
And in D365 schedule data jobs, we can see out messages being processed successfully.
